A handwritten sign at the Hazelfield Farm stand at the farmer’s market read, “Garlic, for cooking or planting.” I’ve quickly come to realize the benefits of cooking with local garlic—the cloves are intensely flavorful without being too “hot”; they’re fresh and firm and easy to slice with few blemished spots. The comparison to the withered, flavorless grocery store variety is stunning.
But planting? Hm. My grandmother has planted garlic for years, though I’d never tried it.
Growing your own garlic couldn’t be easier, and it’s a great addition to your planting bed, especially now that all kinds of heirloom varieties are available. IMPORTANT: Don’t try this with grocery-store garlic; it won’t work. Typically, grocery garlic is grown in China and treated so it won’t sprout. Instead, find a couple of large, solid heads at a farmer’s market—buy several heads for cooking, and two or three (depending on your space) for planting.
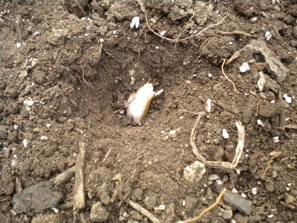
Garlic can be planted in late fall in the Midwest (we’re in USDA Garden Hardiness Zone 6). Choose a spot that you can devote to garlic until mid-June. The plants get about 2 feet tall, and they’re green and leafy, so you could plant garlic pretty much anywhere in your landscape. Cultivate your garden soil to a depth of about 8 inches and remove any rocks. Mark rows 12 inches apart (a planting stick comes in super handy for this task). Use a small trowel or dibble to make holes 2 inches deep at 6 inch intervals. Separate garlic cloves and place one in each hole (pointy end up). Cover with soil, then add a layer of mulch or dried leaves to protect the growing plants over the winter.
Garlic will likely sprout in the fall, and then stop growing until spring. Once growth starts, remove the mulch and add compost or organic fertilizer. The shoots will produce bulb-like “scapes” in late spring, there’s some disagreement over whether it’s best to trim those to force energy into the bulb underground, or to leave them be. (If you do trim them, then slice them and use them like fresh garlic.)
Watch for the leaves to yellow in early summer, when the lower half of the plant is withered, then it’s time to dig up your garlic. Use a cultivator to loosen the soil and then pull up the plants. Knock off any loose dirt.
Put the bulbs aside in a warm, dry place for two to three weeks to cure. Then trim off the roots and stems and leaves and brush off any loose skin. The skin should be dry, papery and tight to the cloves. Curing the garlic extends its shelf life.
The beauty of planting garlic is its exponential nature: The more you plant, the more cloves you get to plan the following year. Get more instructions for growing your own garlic here.


Love, love, love to grow my own garlic. Especially the hardneck varieties that sprout the lovely scapes in June.
Pingback: How to cook with: garlic scapes. | writes4food | cooking, eating, drinking in the Midwest
Pingback: Harvesting homegrown garlic. | writes4food | cooking, eating, drinking in the Midwest
Do you know if this will work on the West Coast? We rarely get any type of frost in Los Angeles.
Beth, I would think you could successfully grow garlic in your own garden in California. After all, Gilroy, CA, is the Garlic Capital of the World!
Pingback: An end, and a beginning. | writes4food | cooking, eating, drinking in the Midwest
Pingback: Fall gardening: arugula. | writes4food | recipes and writing about food, wellness, creativity
Pingback: Garden glory. | writes4food | recipes and writing about food, wellness, creativity
Pingback: Cooking with garlic scapes. | writes4food | recipes and writing about food, wellness, creativity
Pingback: What to do with garlic scapes. | writes4food | recipes and wisdom from a Midwestern kitchen
Pingback: Garden catalogs have arrived. | writes4food