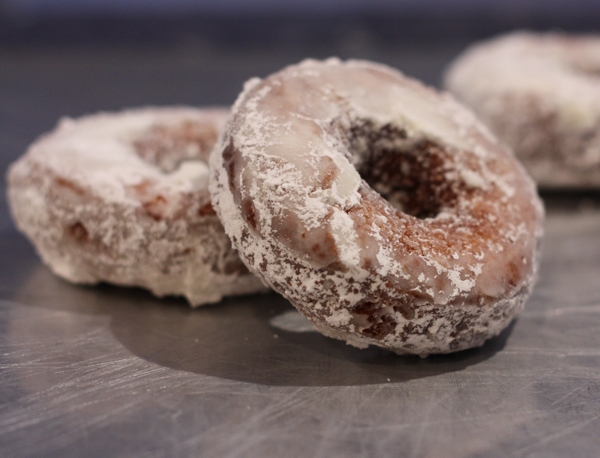
The Clara Project brings us another thumbs-up: a classic recipe for homemade doughnuts (or donuts, in modern spelling). These are absolutely fantastic, and every bit as easy to make as a batch of Sunday-morning pancakes or waffles. I’d never made homemade donuts before, but this great recipe will go into my regular baking repertoire for sure.
If you’re put off by the idea of deep-frying these, don’t be. [At least, not from a preparation standpoint, and heaven knows we’re not going to discuss the caloric implications. C’mon: They’re donuts.] Frying these homemade donuts is a no-brainer, and contrary to my expectations it produced no splattery mess on my stove. You’ll need a heavy, deep pot (a Dutch oven works well) and a thermometer that reaches at least 350 degrees (my combination candy/deep fry thermometer did the job).
These homemade donuts are wonderful: Warm, sweet, delightfully crunchy on the outside and impossibly tender on the inside.
Clara marked her doughnut recipe ‘good’ in the upper left-hand corner, and I would agree (as would Rob and Mom, who gamely did the taste-testing, God love ’em). I did make some modifications, as I found the order of preparation instructed on the vintage recipe card to be wonky. Clara made a note that the 1/2 cup of milk called for was too much, so I reduced the milk to 1/3 cup and then added another teaspoon to make the dough come together.
Note: These are superior when they’re still warm and not nearly as good the next day. If you find you need to reserve part of the batch to eat later, I’d recommend that you not sugar them right away and instead do so just before you eat them.


OLD-FASHIONED HOMEMADE DOUGHNUT RECIPE
(makes about 8, plus donut holes)
1 1/2 cups bread flour (can substitute all-purpose)
1/2 tsp. salt
2 tsp. baking powder
1/4 tsp. cinnamon
1 Tbsp. melted butter
1/2 cup sugar
1 egg
1/3 cup milk (more may be needed)
vegetable or canola oil for frying
1 cup (or more) powdered sugar for finishing
special equipment: deep-fry thermometer; heavy, deep pot (like a Dutch oven); paper bag (like a lunch sack)
Into a medium bowl, sift together the flour, salt, baking powder and cinnamon. In a large bowl, combine melted butter, sugar and egg; use a wooden spoon to whip the mixture until it's a bit foamy and light in color, about 1 minute. Add half the milk to the sugar/egg mixture and stir to blend, then add half the flour mixture and combine well. Add the remaining milk, stirring, and finally the remaining flour mixture, adding another teaspoon or two of milk if the dough seems too dry (the additional milk will help the dough come together completely). The dough will be tacky to the touch. On a lightly floured surface, gently pat the dough into a circle 1/2 inch thick. Use a doughnut cutter (or two round cutters; I used a 2 1/2-inch round with a 1 1/4-inch round for the center) to cut out classic donut shapes. Gather the scraps and re-form into a circle, cutting extra 'holes' if you have a little bit of dough left.
Line a baking sheet with several layers of paper towel. Pour about 1 cup of powdered sugar into the paper sack.
Into a heavy, deep pot pour about 2 inches of canola or vegetable oil and heat over medium-high heat until a deep-fry thermometer shows that the oil has reached 355 to 360 degrees. When the oil is hot, gently slip 2 or 3 donuts into the pot (don't crowd them); cook for about 2 minutes until donuts are deeply golden brown on one side. Use a strainer or spatula to turn the donuts over and cook for another 1 to 2 minutes, until they're evenly brown all over. Maintain the heat under the pot so that the thermometer consistently reads 350 to 355 degrees (cooking the donuts at this temperature will ensure that they have a crispy exterior without a greasy taste).
Remove the cooked donuts to the paper towel-lined baking sheet. Continue cooking the remaining donuts and donut holes. When the donuts are just cool enough to handle, place them, one or two at a time, into the paper sack with the powdered sugar; shake to coat and then tap off any excess. (Note: If you're saving some of the donuts to eat later, sugar them before you enjoy them.)

 About The Clara Project
Once a week, I’ll make and share a recipe from a collection of vintage recipe cards that were written in the 1930s by Clara Shenefelt. See all the Clara Project recipes.


I just love your posts. There is something about digging up an old recipe that makes me feel good.
Meals and memories is what it is all about for me. Keep it up. I’m inspired.
Wishes for tasty dishes,
Linda @ Tumbleweed Contessa
I was thrilled to read about the Clara Project and the marvelous way in which it all began–quite a wonderful thing! The sight, scent and feel of an old recipe card can be magical just imagining its author, the kitchen, the meal, etc. What a treasure you have in Clara’s recipes. I am in the process of posting my mom’s letters (and recipes) to her mom beginning in the 1940s, and so far have put up about 270 recipes thus far. (There are nearly 2000 letters, and I’m about 1/3 of the way through them.) I know that your visit with Clara’s daughter must have been wonderful and it is so nice that you made that special connection. I’m certain it will forever hold very special meaning to the family. Best wishes!